

Applies to: NITRO Studio for SharePoint Server 2016 / 2019 / Subscription Edition (SE), on-premises. Fresh installation; version 2.7.33.0 and above. For SharePoint administrators.
What this guide covers. This document explains how to install Crow Canyon NITRO Studio on an on-premises SharePoint farm for the first time. All steps are performed with the NITRO Studio Helper tool (NITROHelper.exe). For a routine upgrade to a new NITRO package release, use the separate NITRO Studio Upgrade Guide (summarised in Part E). If you are moving an older NITRO installation (version prior to 2.7.33.0) onto the new deployment model, use the separate NITRO Studio Upgrade Guide (version 2.7.33.0) instead — that is a special one-time migration and is out of scope here.
Part A — About NITRO Studio and how it deploys
NITRO Studio is a no-code / low-code application and workflow platform that runs inside on-premises SharePoint. Administrators and power users use it to build forms, workflows, dashboards, notifications, and complete business applications (Help Desk, Purchasing, and others) on top of SharePoint lists — all executed server-side on the farm.
A NITRO Studio deployment has three parts:
- Farm solutions (WSPs). Three SharePoint solutions are deployed to the farm:
- CrowCanyon.CommonUtils.wsp — shared library (data models, expression evaluation, notifications, SharePoint utilities). Deployed globally (farm-wide).
- CrowCanyon.WorkflowManager.wsp — the workflow engine. Now deployed globally (farm-wide).
- CrowCanyon.NITROStudio.wsp — the NITRO Studio UI feature. Deployed globally (farm-wide).
The two engine assemblies (CrowCanyon.CommonUtils.dll and CrowCanyon.WorkflowManager.dll) are installed into the farm GAC by these solutions.
- One site-collection feature. A single feature — Crow Canyon NITRO Studio Feature — is activated per site collection. Activating it adds the NITRO entry points to the site’s gear (Settings) icon and site menu. Creating the required lists, timer jobs, and workflow event wiring is handled by the Helper tool and by NITRO itself — not as a side effect of activating the feature.
- The NITRO package (CDN files). The front-end files — JavaScript, CSS, images, and application definitions — are uploaded into a SharePoint document library (“the package”). The package can live in each site collection, or be shared by a whole web application from one nominated site collection.
The Helper tool at a glance
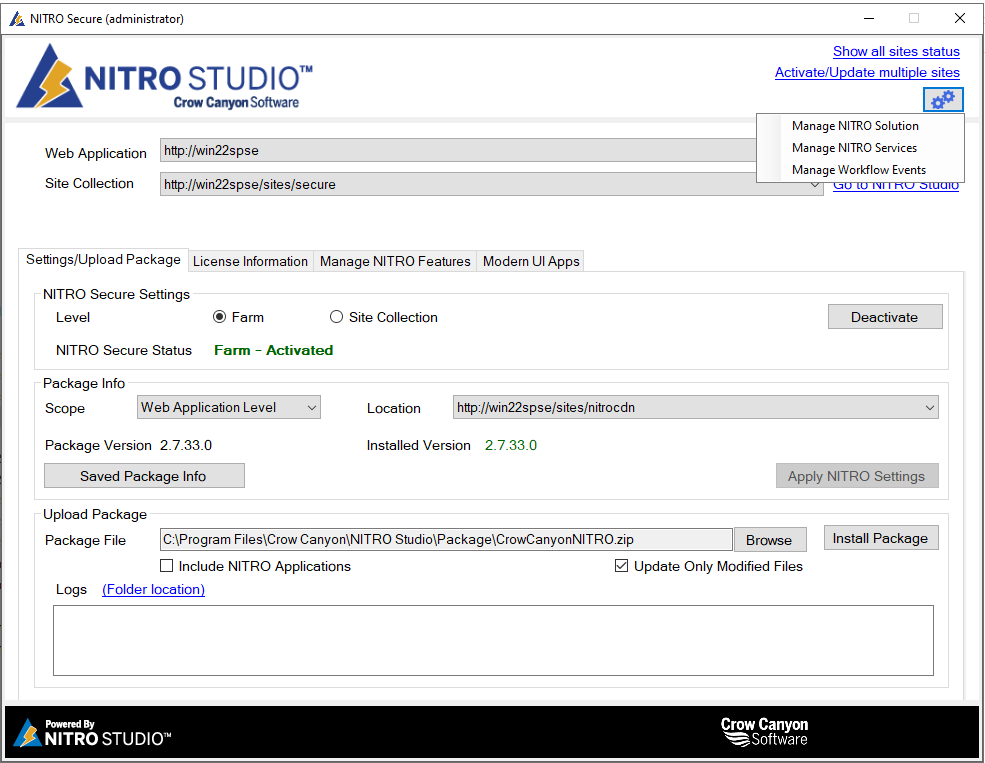
- Main window — used to set up and manage NITRO in a single site collection. It also hosts the license, feature, package, and (where applicable) Modern UI screens, and a settings button (top-right) that opens the farm-level management screens.
- Activate/Update multiple sites — a separate window for installing and managing many site collections at once in a web application.
- Settings button → three management screens: Manage NITRO Solution (deploy/upgrade the WSPs), Manage Workflow Events, and Manage NITRO Services (timer jobs / Windows Services).
Part B — Prerequisites
- SharePoint. SharePoint Server 2016, 2019, or Subscription Edition (SE), installed and healthy. The SharePoint Administration and Timer services must be running across the farm.
- Account rights. Run the Helper tool with an account that is a Domain user, a local Administrator on the server, a SharePoint Farm Administrator, and a Site Collection Administrator of the target site collections.
- .NET Framework 4.7.2 or later, on the server where you run the Helper tool.
- Where to run. Run the Helper tool on a SharePoint server in the farm (a Web Front End or application server) so the SharePoint Server Object Model is available.
- Maintenance window. Deploying or upgrading the farm solutions stops/starts SharePoint services and recycles IIS. Plan a short maintenance window and take your standard backups as a precaution.
Part C — Fresh installation
Perform the steps in order. Steps 1-5 bring the farm and the first site collection fully online; Steps 6-8 cover individual sites, licensing, and multiple site collections.
Step 1 — Launch the Helper tool
Start the NITRO Studio Helper on the SharePoint server. If the account is not a Farm Administrator the tool exits immediately, so confirm your rights first (Part B).
At the top of the main window, choose the Web Application and then the Site Collection you want to work with. The tabbed area below shows License Information, Manage NITRO Features, Settings/Upload Package, and (on SP2019/SE with an app catalog) Modern UI Apps.
Step 2 — Deploy the NITRO solutions
Open the settings button (top-right) and choose Manage NITRO Solution. This screen installs and deploys the three farm solutions.
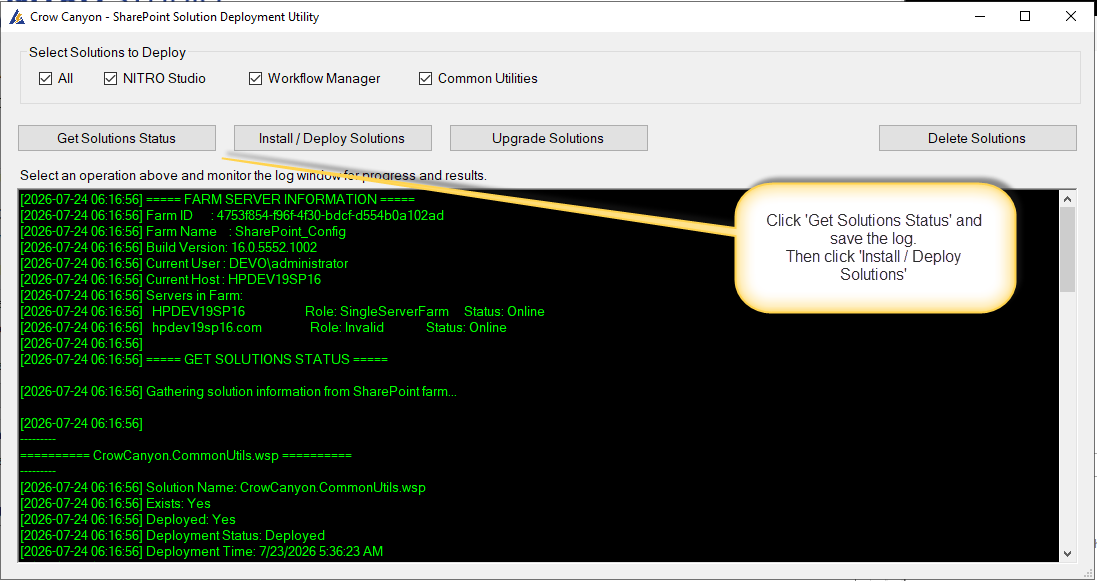
- Leave all three solutions checked (the All check-box selects them together).
- Click Get Status first to confirm you are on the correct farm and to see that the solutions are not yet present.
- Click Install / Deploy Solutions. On a fresh farm the tool simply adds and deploys the three solutions in dependency order (Common Utilities → Workflow Manager → NITRO Studio) and verifies them, then shows a Deployment Summary.
Fresh install vs. migration. On a fresh farm you will not see the “old solution” upgrade prompt, and the tool does not deactivate any deprecated features or retract old solutions — there is nothing to remove. (That prompt and the deactivate/retract steps only appear when migrating from the older features-based version.)
The tool restarts itself after a successful deploy. It saves its log and relaunches so the newly deployed assemblies load into a fresh process. Wait for it to reopen (it shows the post-deploy status) before continuing.
The feature is not activated here. Deploying the solutions makes NITRO available on the farm but does not switch it on for any site collection. Enabling NITRO per site collection (activating the feature, creating lists and timer jobs) is done later by Apply NITRO Settings (Step 5). On multi-server farms, if NITRO does not work on some servers after deploying, run Install / Deploy Solutions again — the full retract/redeploy forces the solution onto every server.
Step 3 — Activate Secure NITRO (enables the package options)
NITRO Studio on-premises runs in Secure NITRO mode, which serves the front-end files from your own SharePoint rather than an external CDN. Back on the main window’s Settings/Upload Package tab, if Secure NITRO is not yet active click Activate (Secure NITRO). Once active, the package upload and settings controls become available.
Secure NITRO is normally activated at the farm level so it applies to every web application and site collection. The tool shows the current status (Farm / Site Collection — Activated).
The site collection option is provided to support migration from a NITRO Azure-based setup to NITRO Secure.
Step 4 — Set the package location and install the CDN package
On the Settings/Upload Package tab, decide where the NITRO package (CDN files) will live using Package Scope:
- Site Collection Level — the package is installed in each site collection that uses NITRO (the traditional layout).
- Web Application Level — the package is installed once, in a nominated site collection, and shared by all site collections in the web application. Choose the site collection that will host the package. This reduces duplication and makes future upgrades faster (you update one location).
About the package site collection. The package site collection simply hosts the CDN files. It is not necessary to install/enable NITRO Studio in the package site collection itself (you do not have to run Apply NITRO Settings there), though you may if that site collection also uses NITRO. The package site collection must be on the same host as the consuming site collections; host-named site collections should keep the package at Site Collection Level to avoid cross-origin (CORS) issues.
Users who work with NITRO-installed sites will need permission on the NITRO CDN library in this site collection. These permissions are set up automatically during the package install process.
Point the package file box at the NITRO package ZIP (defaults to the Package\CrowCanyonNITRO.zip beside the tool; use Browse to pick another), then click Install Package to upload the files to the package site collection.
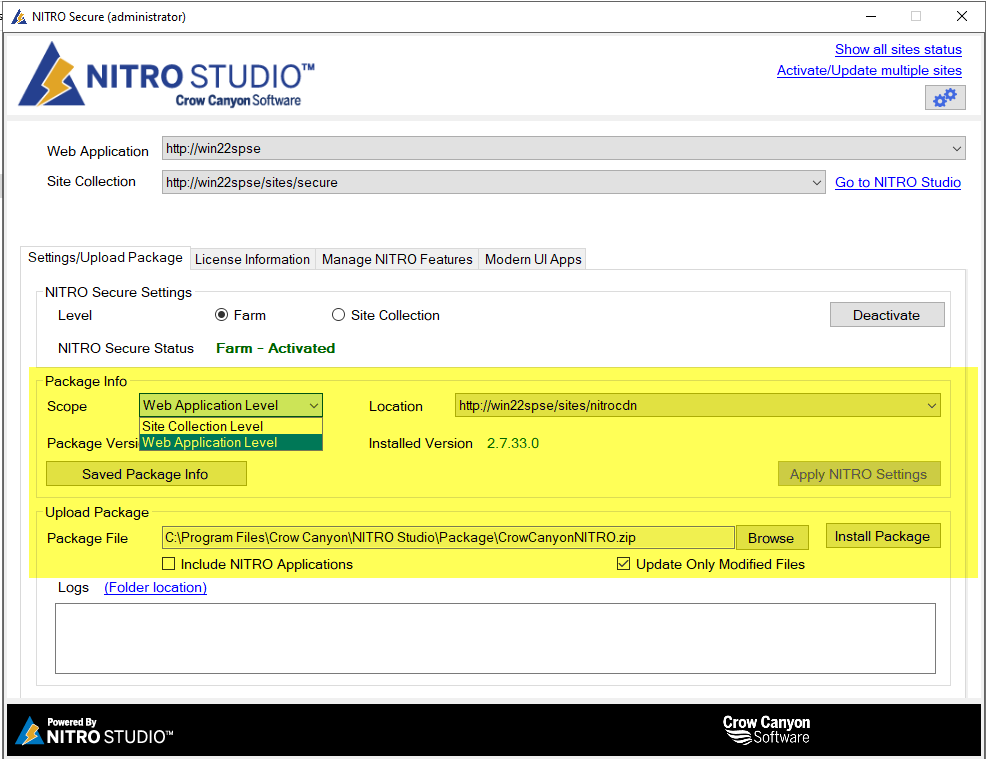
Two options that control what gets uploaded
- Include NITRO Applications — when checked (default), the pre-built NITRO applications (Help Desk, Purchasing, and others) are included. If you use NITRO Studio only as a framework to build your own applications and do not want the pre-built ones, uncheck this box to skip those files.
- Update Only Modified Files — when checked, the tool compares an MD5 checksum of each file against the copy already in the library and uploads only files that changed. This is a big time-saver on package updates. Leave it unchecked for a first install or if you want to force a full re-upload.
Step 5 — Apply NITRO Settings to enable NITRO in the site collection
With the site collection selected, click Apply NITRO Settings. This single action does everything required to set up and enable NITRO Studio in that site collection:
- Activates the Crow Canyon NITRO Studio Feature (and ensures the retired legacy features are not active).
- Records the package scope and location so the site’s NITRO apps load the CDN files from the right place.
- Creates the required NITRO SharePoint lists (for example CCSWorkflowManagerSettings, CCSCommonMailTemplates, CCSDocuSignRequests).
- Creates the NITRO timer jobs for the site collection (unless the farm is set to use the NITRO Windows Services — see Part F).
Saved Package Info shows the currently saved package scope and location for the selected site collection at any time.
Manage NITRO Features tab. On the current version this tab shows only the NITRO Studio feature. The old Workflow Manager and Mail Templates features are retired and are hidden, because they are no longer used. You normally do not need this tab — Apply NITRO Settings activates the feature for you — but it is available for manual activate/deactivate if required.
Step 6 — Activate NITRO on individual sites (subsites)
After the site collection is set up, activate NITRO on each site (web) where you want it:
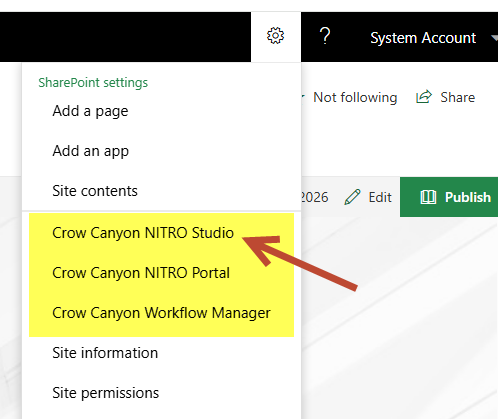
- Browse to the site and open the gear (Settings) icon.
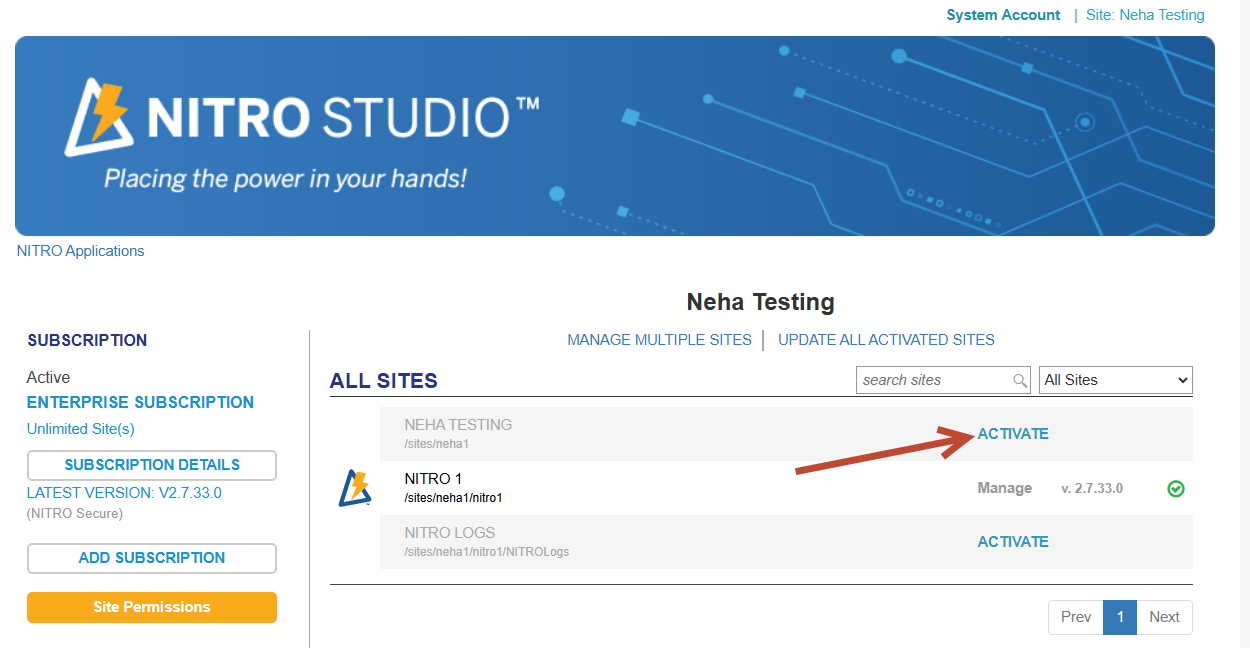
- Open the Crow Canyon NITRO Studio administration page.
- Click Activate for the site and confirm success.
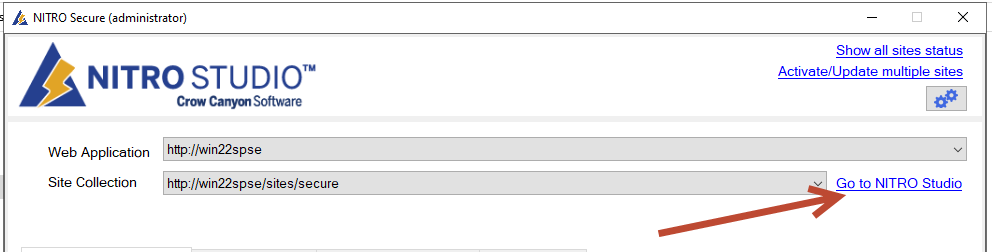
Or:
Step 7 — Register the license
On the main window’s License Information tab, paste your license key and click Activate. NITRO includes a trial period; enter the permanent key when you receive it. Enterprise/farm keys are stored at the farm level; site-collection keys are stored per site collection. The License Information tab is unchanged from previous versions.
Refer to this article for more information on licensing: https://help.crowcanyon.com/article/629/
Step 8 — Installing many site collections at once
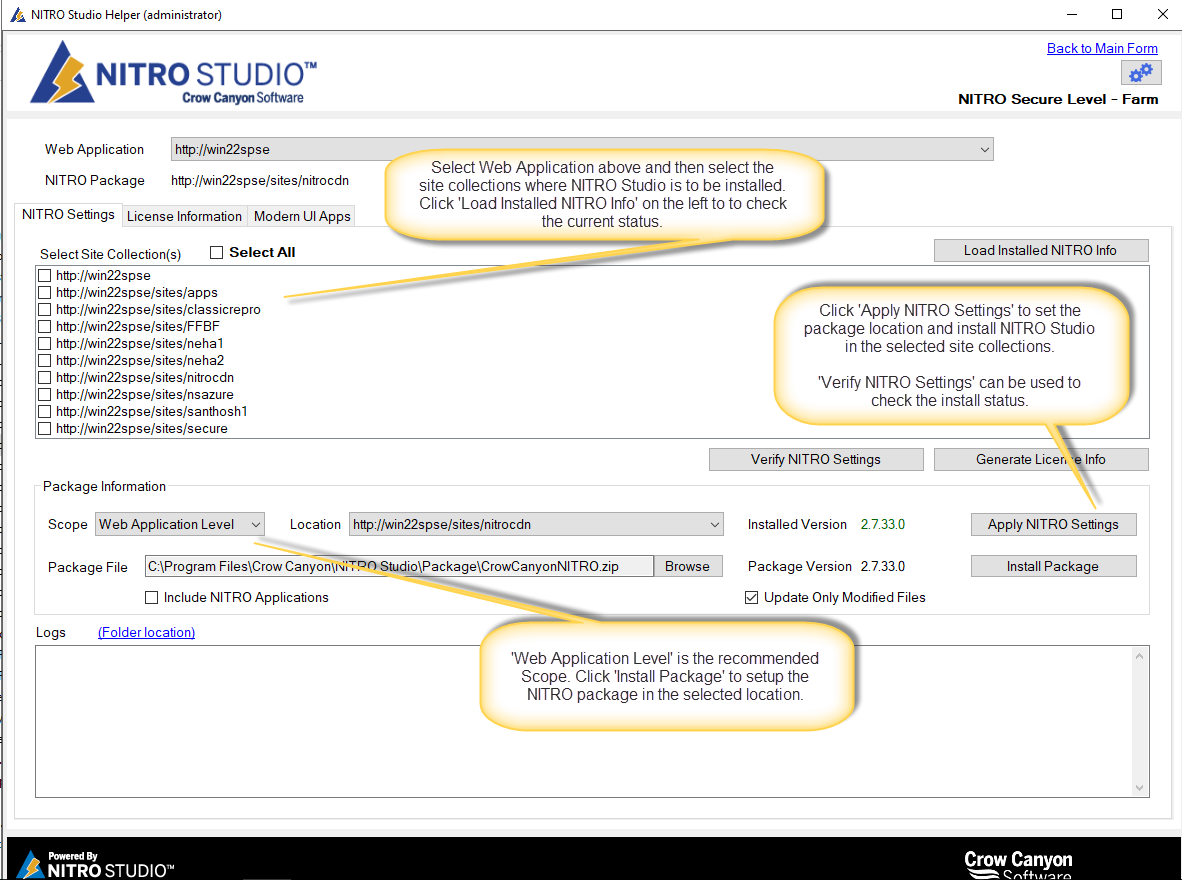
The main window handles one site collection at a time and is sufficient when NITRO is used in a single site collection. To install or manage many site collections together, click Activate/Update multiple sites on the main window to open the multi-site window.
Typical multi-site flow
- Select the Web Application; the site collections load into the checkable list. Click Load Installed NITRO Info to see each site’s current status ([Installed] – [Site Collection Level] / [Web Application Level], [Not Installed], or [Azure]).
- Set the Package Scope (and package site collection for Web Application Level).
- Check the site collections to configure and click Apply NITRO Settings — for every selected site this activates the NITRO Studio feature, saves the package location, creates the required lists, and creates the timer jobs.
- Click Install Package to upload the CDN files. (For Web Application Level the package is uploaded once to the nominated site; for Site Collection Level it is uploaded to each selected site.) The Include NITRO Applications and Update Only Modified Files options work exactly as on the main window.
- Use Verify NITRO Settings to produce a per-site validation report (feature active? package info set? lists present? timer jobs present and enabled?), shown as an HTML report with a clear Success/Failed banner per site.
- Generate License Info collects the Farm ID, Web Application ID, and the selected Site Collection IDs/URLs to send to Crow Canyon when requesting keys.
Part D — The management screens (settings button)
The three screens under the main window’s settings button manage the farm-level parts of NITRO. Their detailed behaviour is documented in the NITRO Studio Upgrade Guide (version 2.7.33.0); the notes below describe how they apply to a fresh installation and routine use.
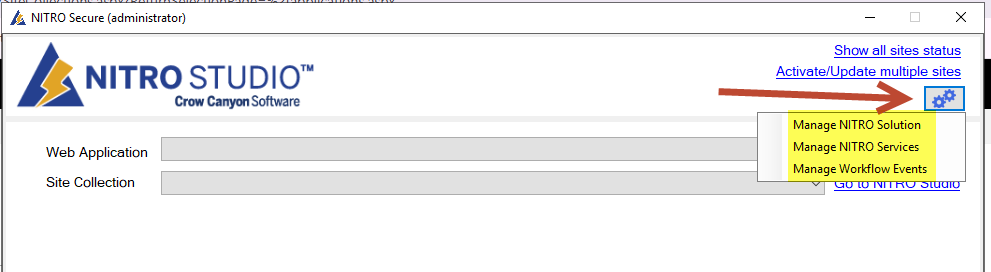
D1. Manage NITRO Solution
Used in Step 2 to deploy the solutions. Keep it for the future: when a new NITRO package is released, this is where you upgrade the solutions (see Part E). On a fresh farm the “old solution” prompt and the deactivate/retract steps do not appear.
D2. Manage Workflow Events
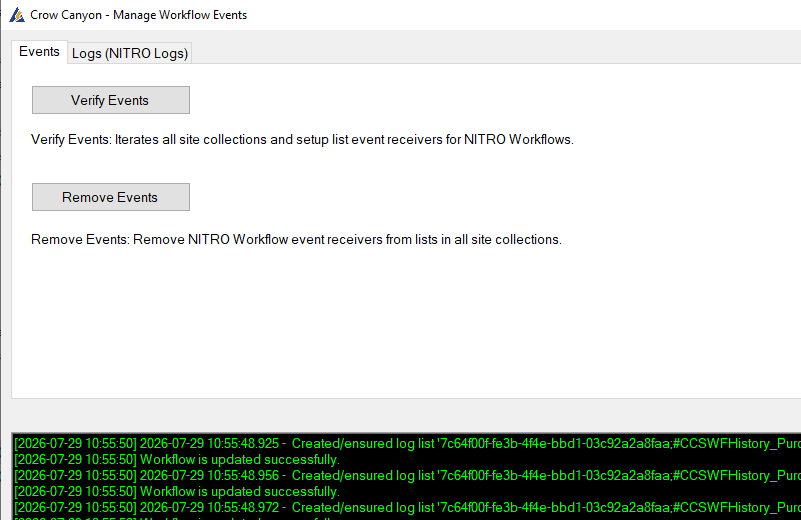
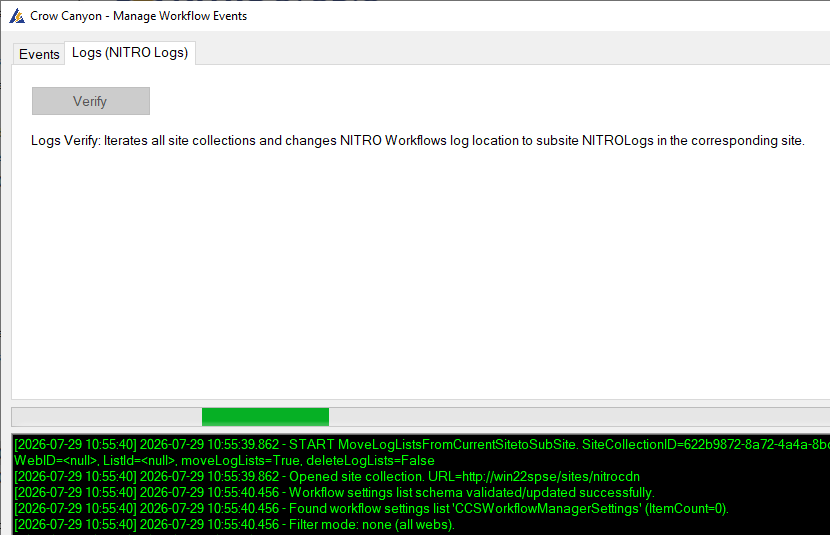
NITRO workflows run from list event receivers. On the current version, these events are wired up automatically whenever a workflow is saved (and removed when a workflow is deleted) — so during a normal installation there is nothing to do here.
This screen is a maintenance tool: use the Events tab to Verify/Create the list-level events across all site collections (for example after a bulk import of workflows, or to confirm health), or to Remove the Crow Canyon event receivers when required. The Logs tab moves workflow log lists into a dedicated “NITRO Logs” (URL: NITROLogs) subsite to reduce clutter in Site Contents.
D3. Manage NITRO Services
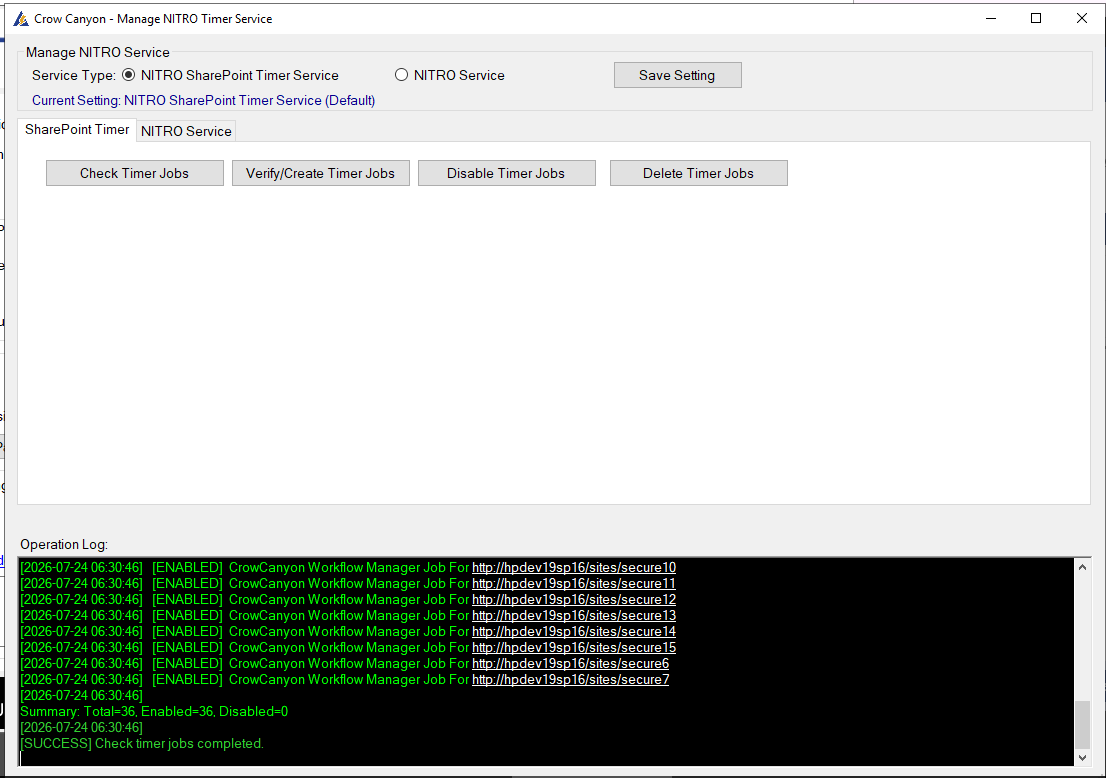
NITRO’s background workflows (async, scheduled, and date/timer) are processed by SharePoint timer jobs that are created automatically when you Apply NITRO Settings for a site collection (Step 5). So for a normal installation you do not need to do anything on this screen.
Use this screen to verify the timer jobs (SP Timer tab → Verify Timer Jobs creates/verifies the jobs for every NITRO-active site; Check Timer Jobs lists their enabled/disabled state), or to switch the farm to NITRO Windows Services instead of timer jobs (NITRO Service tab). Windows Services are an optional alternative covered in Part F.
Part E — Upgrade (a new NITRO package is released)
Applying a new NITRO Studio package release — the everyday upgrade you perform when Crow Canyon ships a new version — is documented separately so it stays a quick, standalone task. See the NITRO Studio Routine Upgrade Guide. In brief: update the three solutions from Manage NITRO Solution (use Upgrade Solutions for a fast in-place upgrade, or Install / Deploy Solutions when you need the solution pushed to all servers), then Install Package for the new build with Update Only Modified Files checked. Workflow events, timer jobs, and feature activation do not normally need attention because you are already on the current model. This is different from the one-time architecture migration (older features-based solutions to the current model), which is covered by the separate NITRO Studio Upgrade Guide (version 2.7.33.0).
Part F — Optional: Windows Services instead of timer jobs
Optional. By default NITRO processes background workflows with per-site-collection SharePoint timer jobs, which Apply NITRO Settings creates automatically. You can instead run three dedicated Windows Services that process many sites from a small set of services. This is optional; timer jobs remain fully supported. Consider services when you have many site collections or want independent control and logging.
F1. What the Windows Services are
| Service mode | Handles | Effective interval |
|---|---|---|
| Timer | Date-triggered (DateColumn) workflows | Every 30 min per site |
| Scheduled | Scheduled Query / Manual / Report workflows + DocuSign polling | Scheduled every 60 min per site; DocuSign every 60 min per site (offset 30 min) |
| Async | AsyncExecution workflows (rapid item changes) | Every 2 min per site |
Minimum deployment: one Timer instance + one Scheduled instance + one Async instance. All three modes must run for full coverage.
F2. Trade-offs and risks
- Timer jobs vs. services. Timer jobs run one job per site collection inside SharePoint’s own timer service. The Windows Services process many sites from a small set of dedicated services, reducing the number of SharePoint timer jobs and giving independent logging and control.
- Multi-server load sharing. Each mode can be deployed across multiple servers to share the load. Every instance of a mode needs a unique ServiceInstanceId, and every instance of that mode must share the same TotalServiceInstances. When configured correctly, all instances of a mode log the same SharedHash.
Availability risk. Workflow processing is partitioned across the running service instances. If the service on one server goes down, the site collections assigned to that instance are not processed until it is restored (or the configuration is changed and services restarted). Plan monitoring and automatic recovery (F4, Step 3).
Configuration drift causes double-processing or gaps. If TotalServiceInstances or the slot interval differ between two instances of the same mode, some sites are processed twice and others never. Always confirm the SharedHash matches across all instances of a mode after starting them.
F3. Switch the farm setting
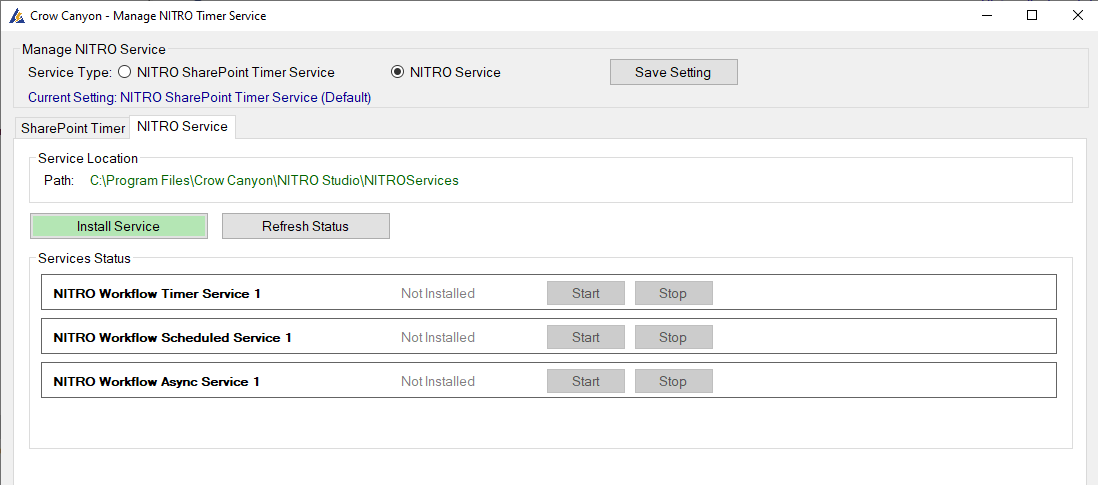
Settings button → Manage NITRO Services → NITRO Service tab lets you choose how the farm processes workflows:
- NITRO SharePoint Timer Service (default) — per-site-collection timer jobs.
- NITRO Service (Windows Service) — the Windows Services described here.
Choose the option and click Save. When the Windows Service option is enabled, Apply NITRO Settings no longer creates per-site timer jobs. The same screen can Install/Remove the services on the local server and Start/Stop each one. Timer jobs across the farm can also be created or deleted from this screen with a click of a button.
F4. Full manual installation steps
Prerequisites
- NITRO Workflows already installed on the farm (GAC contains CrowCanyon.WorkflowManager.dll and CrowCanyon.CommonUtils.dll) — i.e. Part C, Step 2 is complete.
- .NET Framework 4.6.2 or later on each service host server.
- Service account with the Log on as a service right and SharePoint Farm Administrator rights. Using the SPTimerV4 account is simplest.
- The host must be a SharePoint WFE or application server (the service calls the SharePoint Server Object Model directly).
Files to deploy
Build NITROWorkflowService in Release and copy these files from bin\Release\ into each instance folder:
NITROWorkflowService.exe
NITROWorkflowService.exe.config     ← edit this per instance
NITROServices.Common.dll
NITROServices.Common.dll.config     ← do not edit
Newtonsoft.Json.dll
Serilog.dll
Serilog.Enrichers.Thread.dll
Serilog.Sinks.Console.dll
Serilog.Sinks.File.dll
System.Buffers.dll
System.Diagnostics.DiagnosticSource.dll
System.Memory.dll
System.Numerics.Vectors.dll
System.Runtime.CompilerServices.Unsafe.dll
System.Threading.Channels.dll
System.Threading.Tasks.Extensions.dll
System.ValueTuple.dll
Do not copy: .pdb, .xml, App.config, or the GAC assemblies (CrowCanyon.WorkflowManager.dll, CrowCanyon.CommonUtils.dll, Microsoft.SharePoint.dll).
Folder layout — one folder per instance
Create one folder per service instance; never share a folder between instances. Recommended: C:\NITROServices\{Mode}-{N}\
C:\NITROServices\
├─ Timer-1\        (Timer service, instance 1)
├─ Scheduled-1\    (Scheduled service, instance 1)
└─ Async-1\        (Async service, instance 1)
For two instances of a mode across two servers, deploy one folder per server (e.g. Timer-1 on Server A, Timer-2 on Server B).
Configure NITROWorkflowService.exe.config (per instance)
Settings that differ per instance:
| Key | Description | Example |
|---|---|---|
| ServiceMode | Mode this instance runs | Timer, Scheduled, or Async |
| ServiceInstanceId | 1-based ID, unique across the whole farm | 1, 2, … |
| TotalServiceInstances | Total instances of this mode across all servers — must be identical on every instance of the mode | 1, 2, … |
Example — two Timer instances across two servers:
Server A  Timer-1\NITROWorkflowService.exe.config
  <add key="ServiceMode"           value="Timer" />
  <add key="ServiceInstanceId"     value="1" />
  <add key="TotalServiceInstances" value="2" />

Server B  Timer-2\NITROWorkflowService.exe.config
  <add key="ServiceMode"           value="Timer" />
  <add key="ServiceInstanceId"     value="2" />
  <add key="TotalServiceInstances" value="2" />
Settings that should match across all instances of the same mode:
| Key | Default | Notes |
|---|---|---|
| ScheduledSlotIntervalMinutes | 5 | Timer/Scheduled only. Must divide evenly into 30 and match across instances of the mode. |
| ScheduledWorkerThreads | 4 | Timer/Scheduled only. May differ per server by CPU count. |
| AsyncTickIntervalMinutes | 2 | Async only. Match across all Async instances. |
| SiteListCacheMinutes | 15 | How long the eligible-site list is cached. |
| SkipIfTimerJobExists | true | Set false only once SP timer jobs are fully deactivated. |
Other useful keys: WarmUpDelaySeconds (45), WarmUpRetrySeconds (60), TimerJobCacheHours (24), LogDirectory (logs), LogMaxSizeMB (50), LogRetentionDays (30), DataDirectory (data).
Install the services (elevated command prompt)
Step 1 — create each service (note the required space after binPath=):
sc create "NITROWorkflow-Timer-1"     binPath= "C:\NITROServices\Timer-1\NITROWorkflowService.exe"     start= auto DisplayName= "NITRO Workflow Timer Service 1"
sc create "NITROWorkflow-Scheduled-1" binPath= "C:\NITROServices\Scheduled-1\NITROWorkflowService.exe" start= auto DisplayName= "NITRO Workflow Scheduled Service 1"
sc create "NITROWorkflow-Async-1"     binPath= "C:\NITROServices\Async-1\NITROWorkflowService.exe"     start= auto DisplayName= "NITRO Workflow Async Service 1"
Step 2 — set the service account:
sc config "NITROWorkflow-Timer-1"     obj= "DOMAIN\svc-nitro" password= "password"
sc config "NITROWorkflow-Scheduled-1" obj= "DOMAIN\svc-nitro" password= "password"
sc config "NITROWorkflow-Async-1"     obj= "DOMAIN\svc-nitro" password= "password"
Step 3 — configure automatic recovery (restart after 1, 2, then 5 minutes; reset after 24h):
sc failure "NITROWorkflow-Timer-1"     reset= 86400 actions= restart/60000/restart/120000/restart/300000
sc failure "NITROWorkflow-Scheduled-1" reset= 86400 actions= restart/60000/restart/120000/restart/300000
sc failure "NITROWorkflow-Async-1"     reset= 86400 actions= restart/60000/restart/120000/restart/300000
Step 4 — start the services:
sc start "NITROWorkflow-Timer-1"
sc start "NITROWorkflow-Scheduled-1"
sc start "NITROWorkflow-Async-1"
Verify
- sc query “NITROWorkflow-Timer-1” should report STATE: 4 RUNNING.
- Check the log in the instance’s logs\ subfolder (e.g. nitro-timer-1-YYYYMMDD.log). ~45 seconds after start it logs the warm-up, the instance configuration, and a SharedHash.
- Compare SharedHash across all instances of the same mode. If the hashes differ, TotalServiceInstances or the slot interval are inconsistent — stop and fix the configs before proceeding.
- If a service fails to start, check Event Viewer → Windows Logs → Application, source NITROWorkflowService.
Coexistence during migration
With SkipIfTimerJobExists = true (default), a service skips any site that still has an active NITRO timer job, allowing gradual migration: deploy and start the services, disable the SharePoint timer jobs for the sites the services should take over, and once all NITRO timer jobs are disabled set SkipIfTimerJobExists = false and restart the services.
Upgrade the services (new version)
- sc stop “NITROWorkflow-Timer-1”
- Copy the new .exe and .dll files into the instance folder — do not overwrite NITROWorkflowService.exe.config.
- If the release adds new config keys, add them manually per instance (see release notes).
- sc start “NITROWorkflow-Timer-1”
Uninstall
sc stop   "NITROWorkflow-Timer-1"
sc delete "NITROWorkflow-Timer-1"
(repeat for Scheduled-1 and Async-1)
Always sc stop and confirm STOPPED before sc delete.
Troubleshooting
| Symptom | Likely cause | Fix |
|---|---|---|
| Service starts then immediately stops | Config validation failed | Check Event Log → Application for the error |
| No log file appears | Wrong LogDirectory or no write permission | Give the service account write access to the instance folder |
| Warm-up retrying every 60s | SharePoint unavailable or account lacks SP access | Confirm SP is running; verify the account is a Farm Admin |
| SharedHash differs across instances | TotalServiceInstances / slot interval mismatch | Correct the mismatched value and restart services |
| Same sites processed twice | Two instances share a ServiceInstanceId | Assign unique IDs; restart services |
| Eligible site count is 0 | No site has NITRO active, or SP connectivity problem | Verify NITRO is active on at least one site collection |
Part G — Verification & troubleshooting
| Area | What to check |
|---|---|
| Solutions | Get Status (Manage NITRO Solution) shows all three solutions deployed. On multi-server farms, confirm NITRO works on each server. |
| Site feature | The NITRO entries appear under the site’s gear (Settings) icon on activated sites. |
| Package | Saved Package Info shows the intended scope/location; NITRO pages load scripts/CSS from that location. |
| Lists | The required NITRO lists exist in the site collection (see the Verify NITRO Settings report). |
| Timer jobs | Check Timer Jobs shows the NITRO jobs enabled per site collection (unless using Windows Services). |
| Workflows & events | A test workflow saves and runs; Verify Events reports no gaps. |
| Services (only if adopted) | All three modes report RUNNING; SharedHash matches across instances of each mode. |
Logs. The Helper tool writes dated log files under its own Logs folder and streams each action into the on-screen log pane. If feature activation fails, run the tool under an account that is both a Site Collection Administrator and a local Administrator, then retry.
