

Applies to: SharePoint Server 2016 / 2019 / Subscription Edition (SE), on-premises.
Use this guide for the standard upgrade. When Crow Canyon releases a new NITRO Studio version, these are the steps to update your farm to it.
For fresh installation, refer to NITRO Studio Installation Guide.
Note: If you are upgrading from a version prior to 2.7.33.0, use NITRO Studio Upgrade Guide (version 2.7.33.0) instead.
Before you begin
- Permissions. Run the NITRO Studio Helper tool (NITROHelper.exe) as a SharePoint Farm Administrator on a SharePoint server in the farm.
- Get the new package. Download the new NITRO package from here: https://www.crowcanyon.info/NITRO/download.html?edition=secure
- Maintenance window. Updating the farm solutions stops/starts SharePoint services and recycles IIS, so plan a short window. Take your standard backups as a precaution.
- Close browsers. Close open NITRO configuration pages so cached scripts reload after the upgrade.
- Windows Services (only if you use them). If your farm processes workflows with the NITRO Windows Services rather than timer jobs, the tool stops them automatically before a solution deploy and updates/restarts them afterward – no manual step is needed here.
Upgrade steps
Perform the steps in order. Steps 1-2 are the core of a routine upgrade; Steps 3-4 are quick confirmations.
Step 1 – Update the NITRO solutions
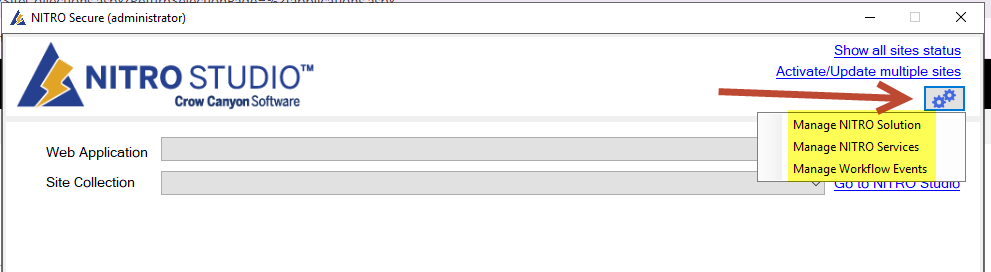
Open the Helper tool, then open the settings button (top-right) and choose Manage NITRO Solution.
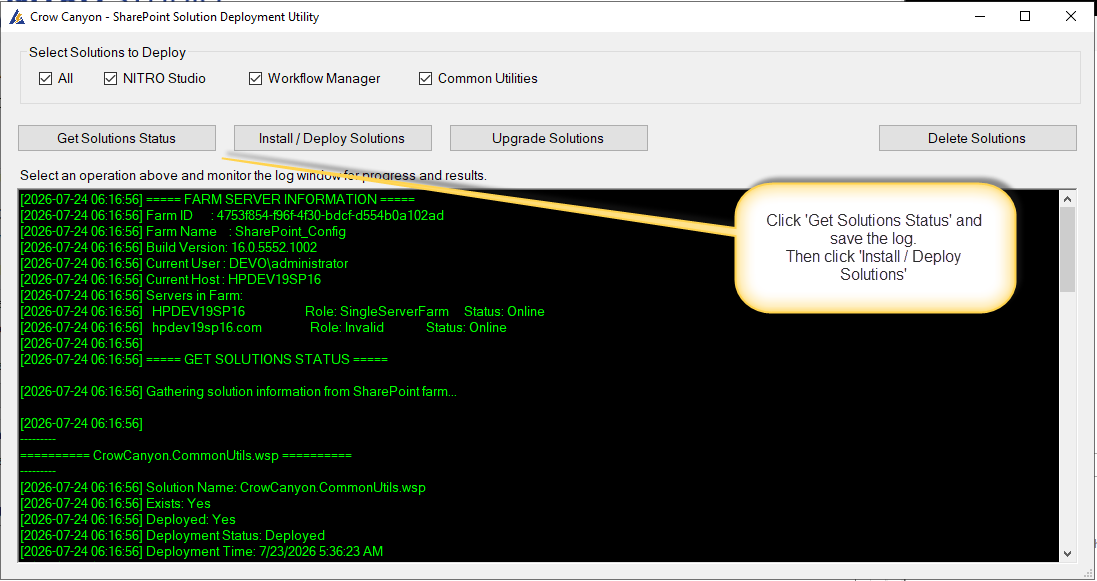
- Leave all three solutions checked (the All check-box selects them together).
- Click Get Status to confirm you are on the correct farm and to see the currently deployed versions.
- Update the solutions using the button that fits your farm (see the decision note below).
Which button?
- Upgrade Solutions – a fast, in-place upgrade. It does not retract, remove, or touch features/timer jobs. This is the normal choice for a routine upgrade on a single-server farm, or a multi-server farm where the solutions automatically get propagated to all servers.
- Install / Deploy Solutions – performs a full retract and redeploy. Use this when you need to be certain the solution is distributed to all servers (for example on a multi-server farm, or if NITRO is not working on some servers after an in-place upgrade).
The tool restarts itself after a successful update. It saves its log and relaunches so the new assemblies load into a fresh process. Wait for it to reopen (it shows the post-deploy status) before continuing. Confirm each solution shows Success in the Deployment Summary.
Step 2 – Install the new package
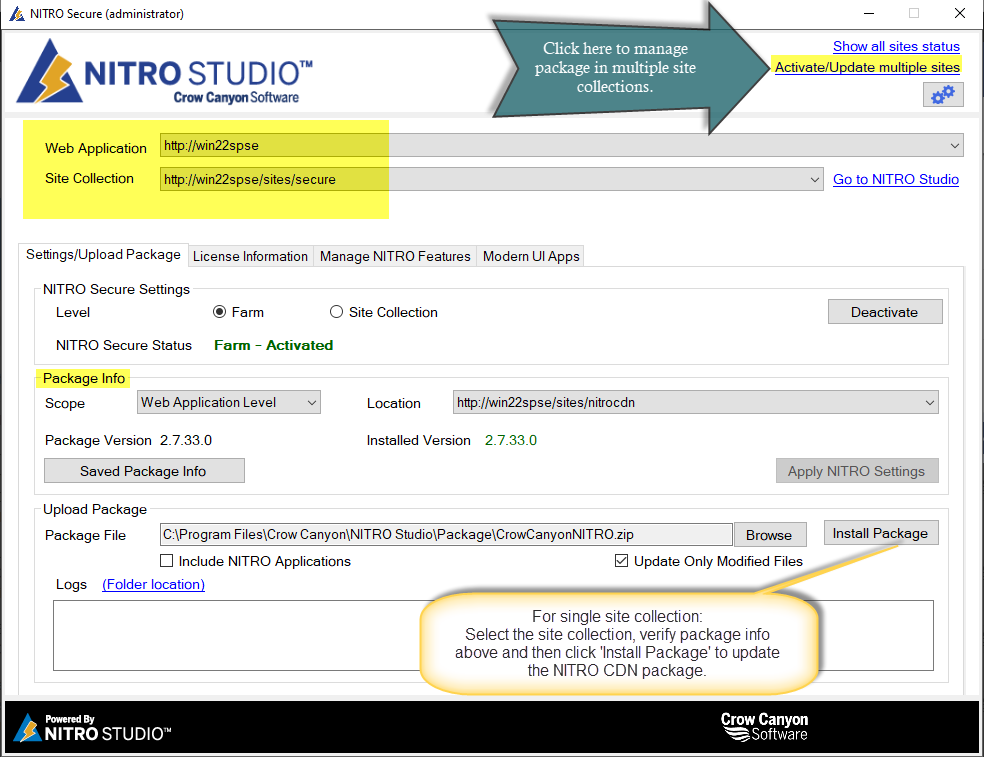
On the Helper tool’s Settings/Upload Package tab (single site collection), or via Activate/Update multiple sites for several site collections, point the package file box at the new package ZIP (use Browse if needed), then click Install Package.
For a single site collection:
For multiple site collections:
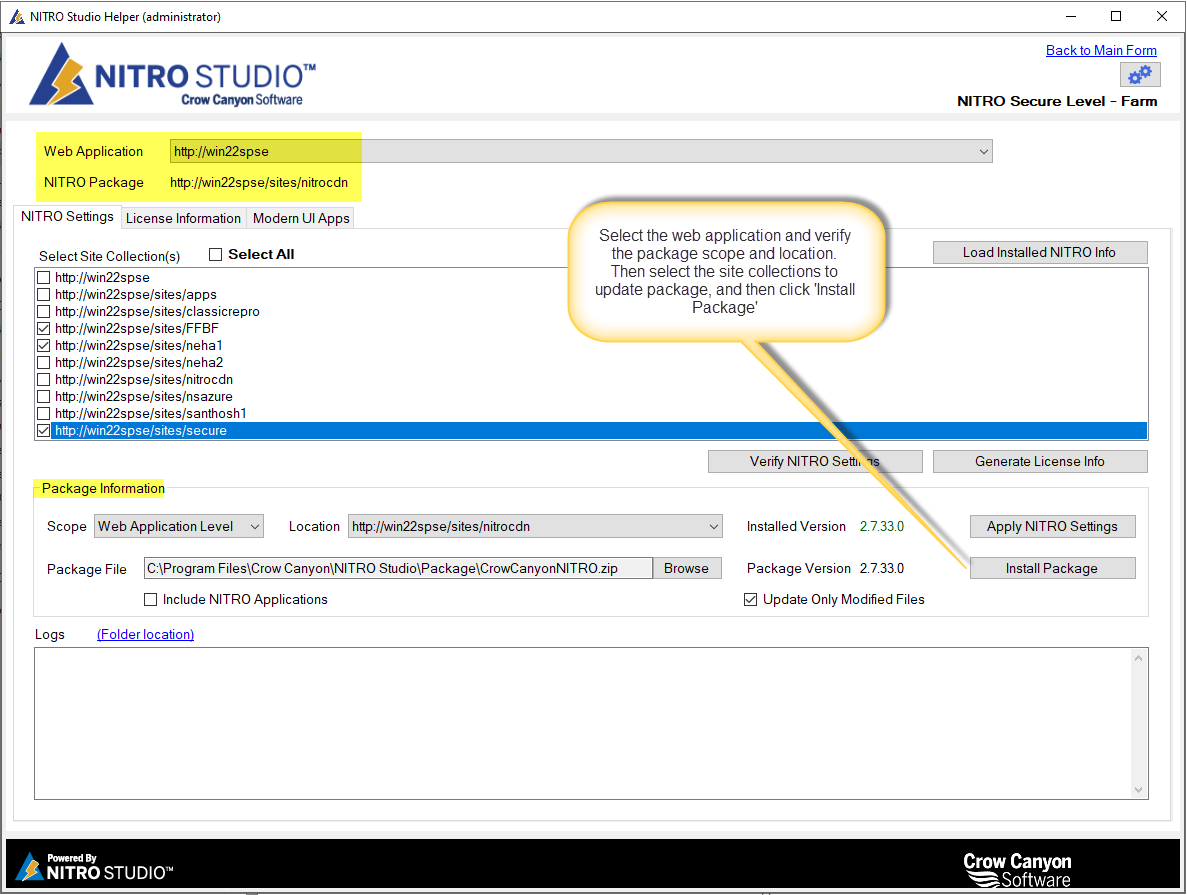
- Keep the same Package Scope (Site Collection Level or Web Application Level) you already use – a routine upgrade does not change where the package lives. For a Web Application Level package, upload once to the nominated package site collection; the other site collections pick up the new files automatically.
- Check Update Only Modified Files. The tool compares an MD5 checksum of each file against the copy already in the library and uploads only the files that changed, so the update is quick.
- Leave Include NITRO Applications set the way you installed originally – checked if you use the pre-built NITRO applications (Help Desk, Purchasing, etc.), unchecked if you use NITRO only as a framework for your own applications.
If the tool detects that the installed version is greater than or equal to the package you are applying, it asks you to confirm before overwriting – useful protection against installing an older package by mistake.
Step 3 – Re-apply NITRO Settings if the release requires it
For most routine upgrades this step is not needed. Re-run Apply NITRO Settings for the affected site collections only if:
- the release notes mention new NITRO lists or columns (Apply NITRO Settings creates/updates the required lists), or
- you took the opportunity to change the package location (for example moving from Site Collection Level to Web Application Level) – in that case also perform a NITRO repair/update on the affected sites so their apps reference the new location.
Use Activate/Update multiple sites → Apply NITRO Settings to do this across many site collections at once.
Step 4 – Verify
- Solutions: in Manage NITRO Solution, click Get Status and confirm the new versions are deployed (and, on multi-server farms, that NITRO works on each server).
- Package: the installed package version now matches the new release; NITRO pages load the updated scripts/CSS (a browser hard refresh helps confirm).
- NITRO site update: navigate to the NITRO Studio home page for the site collection(s) and run NITRO update for the NITRO-activated sites in the site collection.
- Optional health check: Activate/Update multiple sites → Verify NITRO Settings produces a per-site report (feature active, package info set, required lists present, timer jobs present and enabled).
- Smoke test: open a NITRO form/dashboard and run a simple workflow to confirm normal operation.
What you do NOT need to do on a routine upgrade
| Area | Why no action is needed |
|---|---|
| Workflow events | List-level events are wired automatically whenever a workflow is saved (and removed when deleted). Use Manage Workflow Events → Verify Events only if a health check shows a gap. |
| Timer jobs | The NITRO timer jobs already exist from the original install and continue to run. Use Manage NITRO Services → Verify Timer Jobs only if verification shows a job missing or disabled. |
| Feature activation | The NITRO Studio feature stays activated across a solution upgrade; you do not re-activate it for a routine release. |
| Windows Services | If in use, the tool stops them before deploy and updates/restarts them after – no manual reinstall for a routine package update. |
Logs & help. The Helper tool writes dated log files under its own Logs folder and streams each action into the on-screen log pane – keep the log from the solution update in case you need to review it.
